“Apple” Body Type (O) in Plus Size: Proportions, Lengths, and Lines in Clothing
Reading time 13 min04.01.2026
"Apple" body type (O): what it looks like and what matters most
The "apple" (O) shape is a proportion type where the most volume is concentrated in the center of the torso: at the waist and belly. The waist may be weakly defined or "blurred" in contour, and the silhouette overall reads as rounder right in the middle.
Often the top is more pronounced as well: the bust can be fuller, the arms rounder, the shoulder line softer. The hips often look calmer, and the legs relatively lighter in the overall proportion. But the key trait is always the same: the center sets the main contour — and clothing proportions, lengths, and lines are chosen around it.
- First variant: medium-sized bust, a more noticeable belly, the waist barely reads, smaller hips, long legs.
- Second variant: bust and hips are closer in width, the waist may show a little, but the center still dominates, and the legs stay relatively longer compared to the torso.
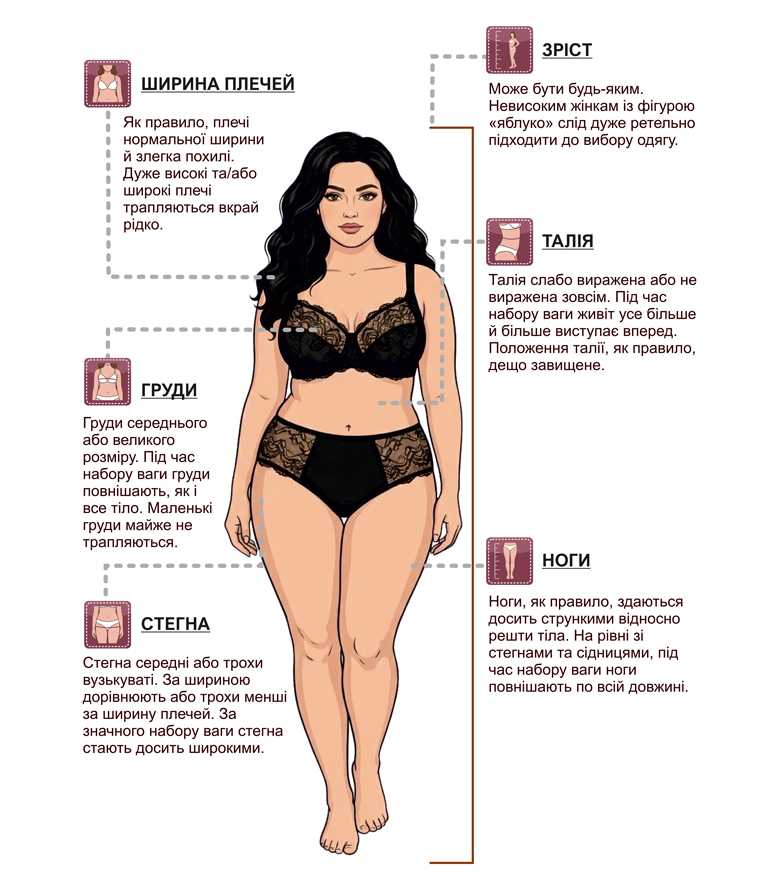
The diagram above shows the key zones to look at first: shoulders, bust, waist/belly, hips, legs, and height. The point isn't to "look for a perfect waist," but to understand exactly where the main volume is concentrated and how it's distributed. The following sections on proportions, lengths, and lines in clothing build on exactly this.
The main job of clothing for the "apple" (O) body type
For the apple shape, clothing needs to do a very practical job: give comfort in the center while also holding a put-together contour. The approach of "either maximally loose or maximally tight" doesn't work here. Pieces that are too loose often add even more volume right where it's already dominant. And pieces that are "too tight" quickly become noticeable not as style but as tension — at the waist, belly, armhole, along the front of the garment.
The first task is controlled freedom. This means there should be enough room to move at the waist/belly: so you can sit, bend, walk at a brisk pace — and the piece doesn't ride up, twist, or need constant "adjusting at the front." Controlled freedom isn't a sack — it's thoughtful ease that lets the body breathe without breaking the garment's line.
The second task is silhouette support. For the apple shape, it's especially important that clothing has points that "gather" the look: a stable shoulder line, a neat neckline, a clean vertical direction at the front (a placket, seam lines, an open layer), and the right length that doesn't end at the widest point. With this support in place, the silhouette looks calm and modern even in simple pieces — no complicated tricks, no need to constantly manage anything.
So the logic for choosing clothing for the apple shape is simple: first check if there's comfort in the center, then check if there's support in the lines and lengths that hold the contour. Once these two things are in place, most styling decisions (silhouette, fabric, details) start to work much more easily.
Fit and construction — where problems most often occur
For the apple shape, fit often "breaks" not because the size is wrong, but because the construction didn't account for the center of volume and the shape of the upper body: a rounder bust line, a wider/more curved upper back, an active belly. As a result, a piece can look fine in a front-facing photo but start behaving unstably in real life: pulling, skewing, riding up, or gathering into folds.
Neckline / armhole / back
The most common problem zone is the top of the garment. If the cut doesn't build in enough room across the upper back and shoulder blades, the piece "looks" for fabric reserve and starts pulling at the neckline and armhole. The neckline can slide back or, conversely, dig in at the front; creases appear at the back near the base of the neck; the armhole pinches when moving the arms, and the sleeve sometimes twists. This is a sign not of a "bad figure," but of a poor balance between front and back and insufficient ease specifically in the upper back.
For the apple shape, it's important that the top sits evenly: when the back has the right amount of ease, clothing doesn't "ride" on the shoulders or pull at the neckline. Constructions with a clear shoulder line and a generous armhole (so the arm lifts without feeling "constrained") often work better, along with softer solutions that don't fix the shoulder too rigidly.
Waist / waistband
The second typical problem zone is anything that "fixes" the waist. If a waistband/elastic sits at the most voluminous point or cinches too tightly, the fabric under it starts to gather, and the garment can ride up. For the apple shape, what matters isn't whether there's a waistband at all, but its softness and the right placement: when the fixation lands at a narrower point (or works as a delicate accent), the silhouette looks cleaner, and the piece doesn't "fight" the body.
In pants and skirts, problems often arise from the difference between belly and hip volume: if the front section doesn't have enough length/room, the waistband rolls under, and the pant leg can "creep" upward. Structurally this is solved either by a fit with enough front ease, or with a more stable waistband that holds without squeezing.
Skewing / "riding up" / gathering
Skewing and "riding up" almost always appear where the garment lacks freedom of movement or where volume is distributed unevenly. If the bottom hem jumps up and the fabric gathers in the center, that's a sign the belly/hip area needs more room or a different material character (so it glides rather than catches). If a piece twists at the side seam, the reason is often that the front and back panels are "working" differently: somewhere it lacked length, somewhere it lacked ease, and the garment compensates with tension.
The main idea of this section is simple: for the apple shape, it's critical that clothing has stable support at the top (neckline/shoulders/back), doesn't "conflict" with the center of volume (waist/belly), and doesn't require constant adjusting while moving. These three zones most often determine whether a piece feels thoughtfully designed and well-fitted, or whether it "lives a life of its own."
Diagram: where fit most often "breaks" in plus size for the apple shape
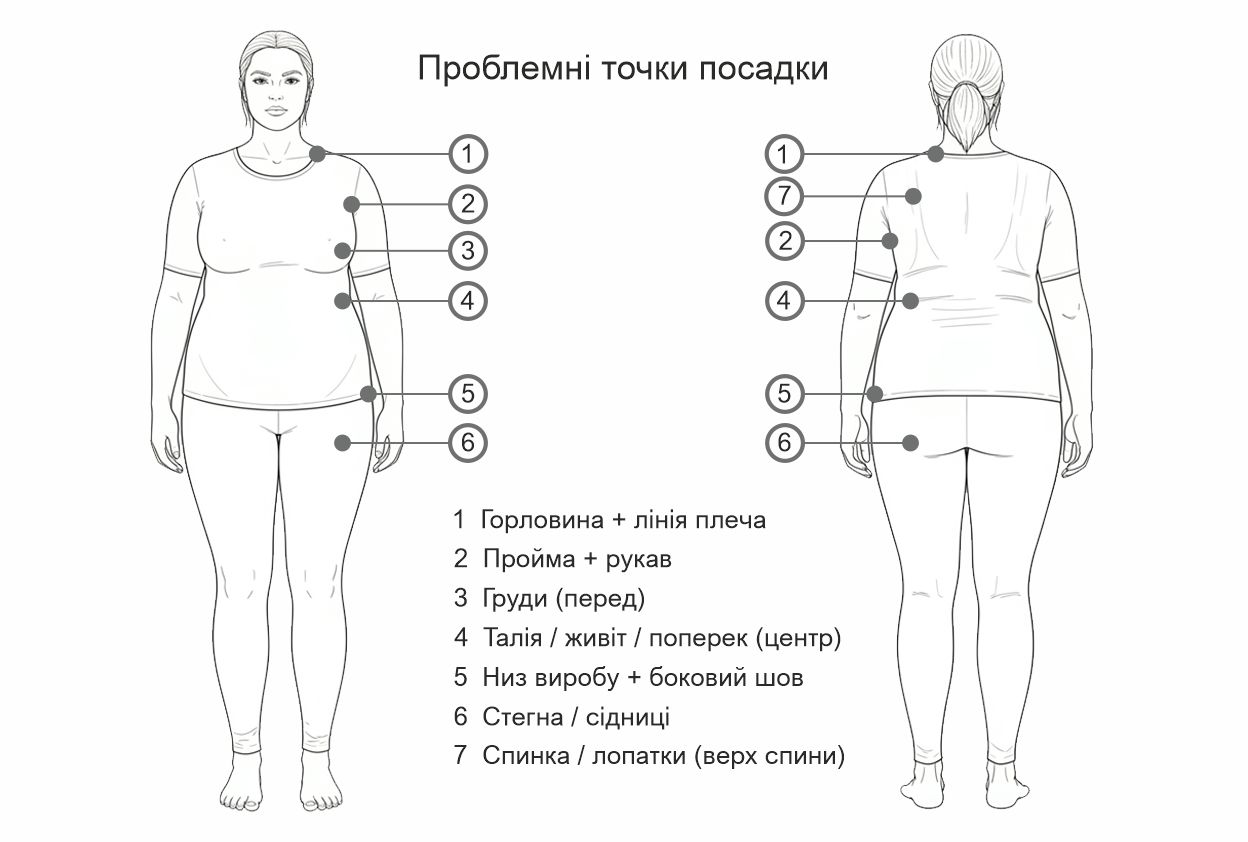
- 1 — Neckline + shoulder line: pinches/"chokes," pulls back, slides, skews the shoulders.
- 2 — Armhole + sleeve: pulls at the underarm, restricts movement, the sleeve "jumps," creases near the armhole.
- 3 — Bust (front): tension, "gaps" across the bust, creases from the bust to the armhole/center.
- 4 — Waist / belly / lower back (center): squeezes, gathers into folds, "rides up" while moving, creases at the lower back.
- 5 — Hem + side seam: twists on the body, skewing, a "wave" along the hem, the back hem pulls up or becomes shorter.
- 6 — Hips / seat: tension and creases, the piece pulls down or rides up at the back.
- 7 — Back / shoulder blades (upper back): tension in the upper back, horizontal creases, "pulls" the sleeves backward.
How to read the diagram: if a piece "sits oddly," the reason is almost always at one or two of the points above. Look at them while moving (a step, sitting down, raising your arms): that's exactly how tension, skewing, or "riding up" shows itself.
Proportions in clothing for the "apple" (O) body type
Proportions are the ratio of the visible length of the top and bottom in an outfit. They're the fastest way to change the impression a figure makes: they elongate the silhouette, or, conversely, "cut" it into parts. For the apple shape, proportions matter especially because the torso's center dominates the contour — and if the figure is divided poorly, attention automatically concentrates on the waist/belly.
For proportions to work for you specifically, go by three things: height (short/medium/tall), degree of fullness (how much volume is in the center), and waist position (higher, lower, or "in place"). Below are the base proportions that most often give a harmonious result for the apple shape.
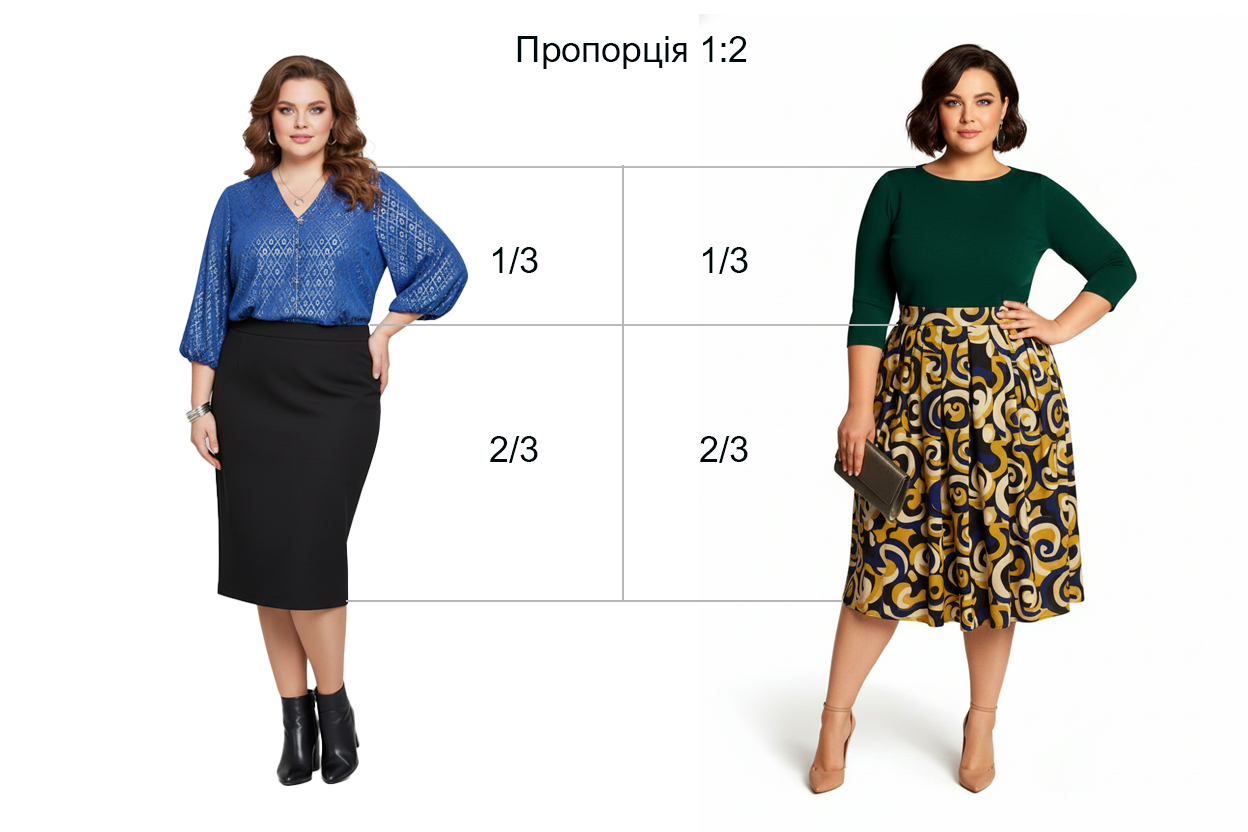
1:1 proportion with pants (top ≈ bottom)
This is an outfit where the visible length of the top roughly equals the visible length of the pants. Most often this works as an elongated, untucked top (a blazer, shirt, tunic, blouse) + pants. The top can be straight or semi-fitted — what matters is that it doesn't end at the belly's widest point without "explaining" lines/cut.
- When it's good: short and medium height; when you want to balance the torso and legs without sharp divisions.
- What enhances it: monochrome or close colors (especially for shorter height), a vertical at the front (a placket, an open shirt/blazer).
- What to avoid: a very short top + a contrasting bottom (often "cuts" the center), heavy horizontals across the belly.

1:1 proportion with a skirt (top ≈ bottom)
Here we do the same thing, but with a skirt as the "bottom": the visible length of the top roughly equals the visible length of the skirt. Most often a medium-length, untucked top (down to the start or middle of the thigh, not higher) + a knee-length skirt (roughly ± 5 cm) works well.
- When it's good: short/medium height, moderate fullness; when you want a "put-together" silhouette without a sheath-dress feel.
- What enhances it: a semi-fitted top (not too tight), a neat vertical (a placket/wrap/seam lines).
- What to avoid: a top hem that ends exactly at the belly's widest point with no lines to gather the front.

1/2 top + 2/1 bottom proportion (shorter top, longer bottom)
This proportion shifts attention downward and gives a sense of longer legs: the top takes up a smaller portion, the bottom a larger one. The most typical version is a dress with an empire seam under the bust (or a clear line above the waist) at around knee length. An important point: the seam shouldn't squeeze — it sets the proportion, it doesn't "cinch" the waist.
- When it's good: when the legs are a strong feature; when you want to visually elongate the bottom without complicated outfits.
- What enhances it: a clean bottom without excess volume; a neat vertical at the front (a placket, a V-line, a wrap).
- What to avoid: too short a length that "cuts" the thigh/calf, and very thin materials that emphasize the center.
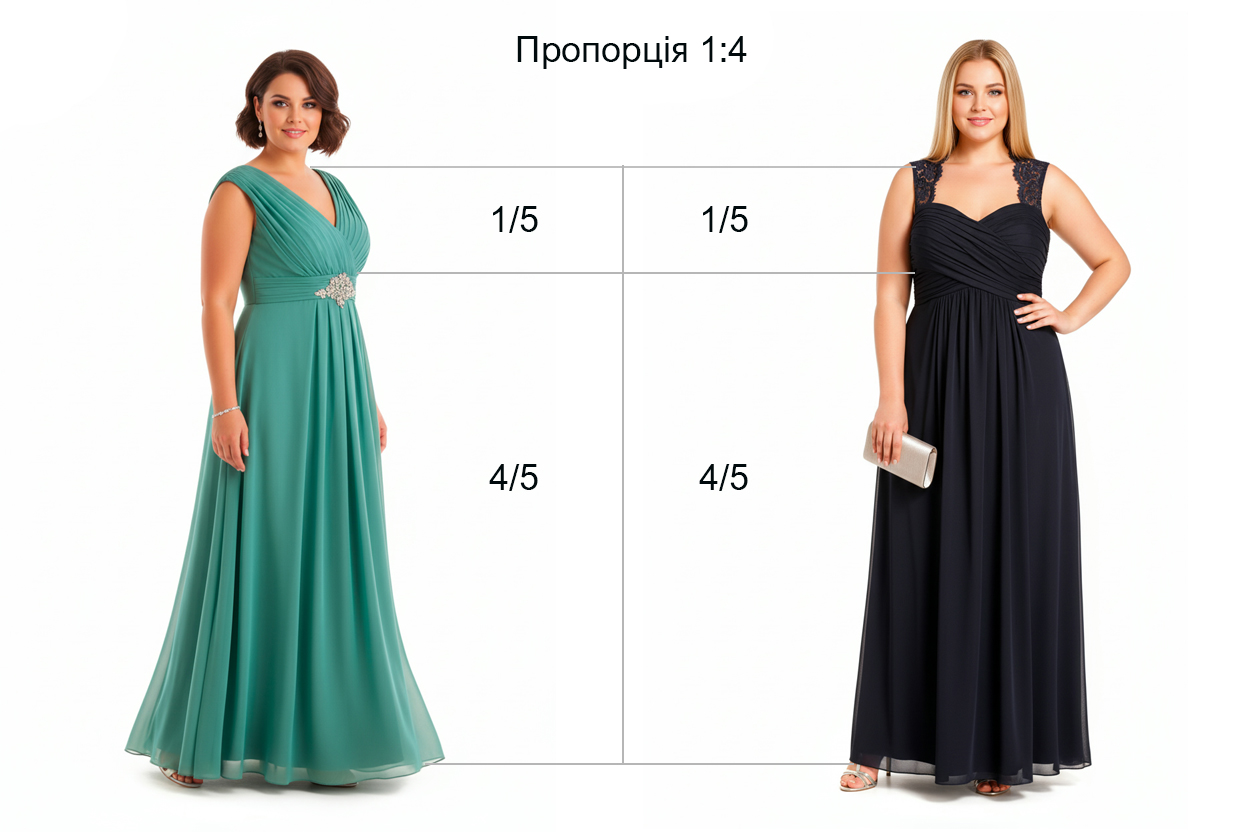
1/5 top + 4/5 bottom proportion (minimal top, maximum bottom length)
This is an "elongating" proportion through length: the top visually shorter, the bottom taking up most of the silhouette. The classic version is a dress with an empire seam under the bust at ankle length or close to it. For shorter height, this is often one of the strongest tricks, because it builds a long vertical without a feeling of being "divided."
- When it's good: short/medium height; when you want to elongate the silhouette as much as possible and make the contour calmer.
- What enhances it: monochrome or close shades, a front line (a placket/wrap), shoes with no sharp contrast.
- What to avoid: heavy horizontals at the widest points and "breaking" the vertical with contrasting inserts in the middle.
A small practical detail: proportions are rarely "either they work, or they don't" — most often they're adjustable. Shifting the top's hem or the length of a skirt/dress by 5–10 cm is sometimes enough to make the outfit feel put-together. So when trying things on, don't look at "trendiness" — look at the ratio of lengths: wherever you feel more balance, that's your proportion.
When a proportion "doesn't sit right"
Sometimes a proportion looks "correct" on paper, but the outfit still feels heavy or "eats up" the legs. The most common reason isn't the numbers but the stopping point: the top's hem, a waistband/elastic, or a color contrast ends up exactly where the volume is greatest. The eye stops on that line — and the center immediately reads as dominant.
The second reason is fabric behavior and fit while moving. If the material doesn't glide but catches on the center, or if the garment lacks length/ease at the front, the piece starts riding up, twisting, gathering into folds. In that case, the problem is no longer the proportion, but the construction and the front/back balance.
Lines in the look — verticals, horizontals, diagonals
Lines in a look are about where clothing creates direction: up-down, across, or diagonally. They're not "stripes" — they're specific things: an open layer, a placket, seam lines and stitching, a wrap, the shape of a neckline, a garment's hem, contrast between top and bottom.
For the apple shape, lines matter because they either gather the silhouette into one vertical, or, conversely, place a "stop line" in the center. So what matters here isn't "which lines are better," but exactly where they run and whether they cross the most voluminous zone.
Verticals
A vertical appears when clothing gives a continuous direction: an open cardigan/blazer, a long placket, an elongated layer, seam lines, a center seam, a V-neckline. Visually, this gathers the silhouette into one line and shifts focus from the center to the overall shape.
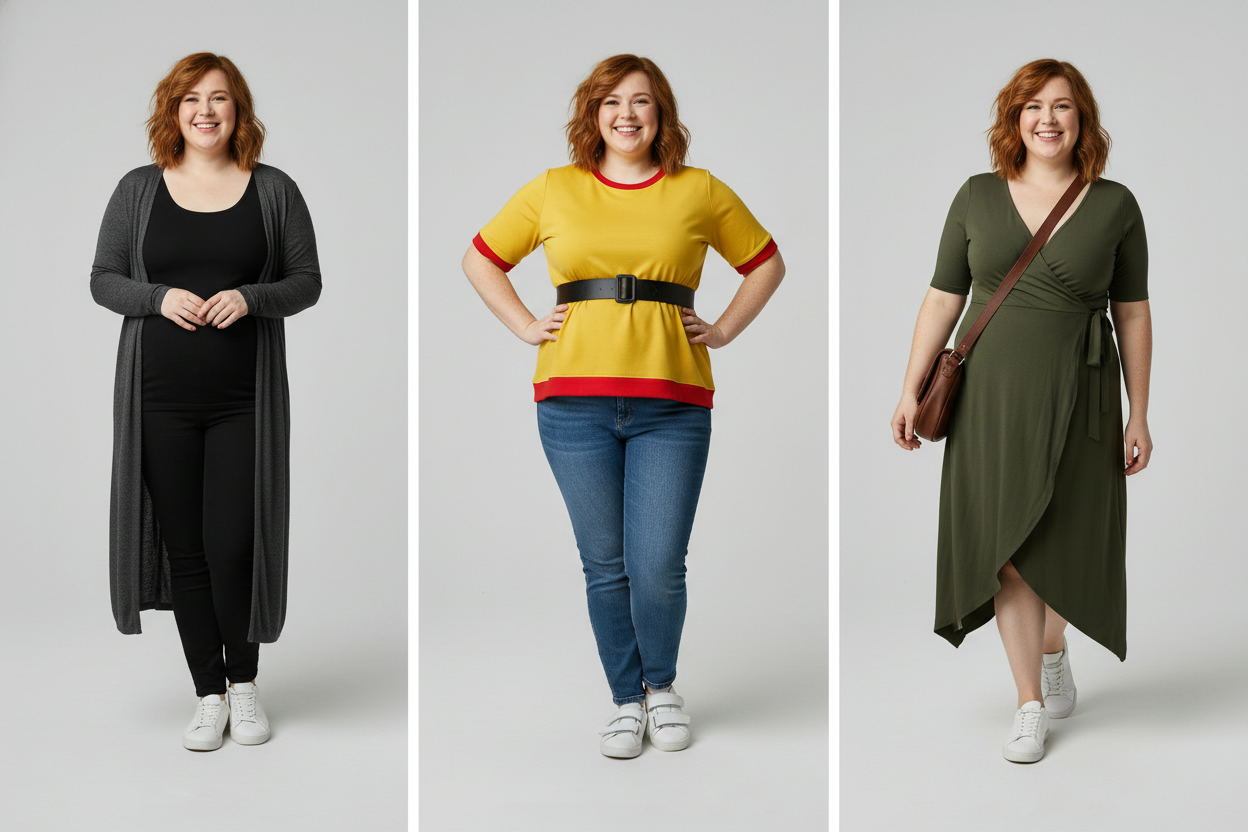
In the collage this is well shown in a look with a long cardigan: it works as a "frame" that holds the vertical and keeps the eye from stopping at the belly.
Horizontals
A horizontal is any line that cuts across the silhouette: a waistband, elastic, a contrast between top and bottom, a short top + a bottom of a different color, a sharp hem right at the level of the greatest volume. The eye stops at this boundary — and it starts "controlling" the perception of proportions.
So horizontals matter not as "good/bad," but as exactly where the line runs. In the middle look of the collage, the belt and the contrast boundary show exactly how the center can become the main focal point.
Diagonals
Diagonals are created by anything that gives a slanted direction: a wrap, an overlap, an angled closure, draping, an asymmetric hem, a belt at an angle, a cross-body bag. A diagonal doesn't "stop" the gaze — it leads it, so the silhouette often reads softer and more dynamic.
In the collage this is shown in the wrap dress: the wrap line forms a diagonal and draws attention away from a straight horizontal "cut."
In short: verticals gather and add length, horizontals place emphasis and divide, diagonals soften and add movement. In practice, this means a simple rule: when you want to feel "lighter and slimmer," add a vertical; when you want to "emphasize," choose a horizontal in a controlled spot; when you want "softer and more modern," bring in diagonals.
Lengths for the "Apple" shape — where the top/dresses/pants are best ended
Length is a "stop line": the place where clothing ends and stops the eye. For the apple shape, it's important that the garment's hem, a waistband, or a contrast doesn't end at the most voluminous zone (the center/belly/upper hips). So we don't go by "centimeters" but by ending points.
The same length can work differently in different outfits: if there's a sharp contrast, a waistband, or a short top nearby, they create a horizontal and "activate" the center. And if there's a vertical (an open layer, a placket, a V-line), the eye moves downward, and the proportion reads more easily.
Tops: where they're best ended
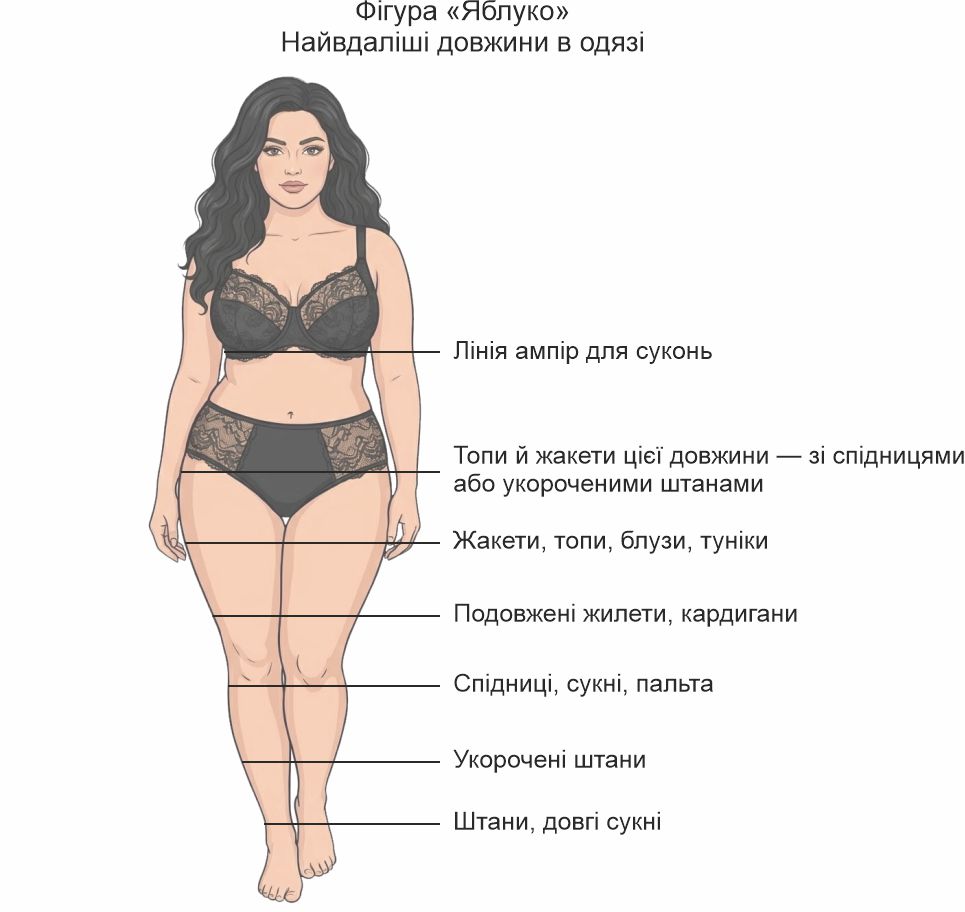
- Under the bust / empire line — moves the "stop line" higher, doesn't pass through the center.
- To the upper thigh — works if the bottom is gathered (a high rise) and there's a vertical (an open layer, a V-line, a placket).
- Below the most voluminous point (to mid-thigh) — a stable option: the garment's hem passes the belly zone without "cutting" it.
Dresses / skirts: where the bottom is best ended
- Just above the knee or at the knee — a clean proportion without an excessive "cutoff."
- Midi below the knee — better if the length passes the widest part of the calf.
- Maxi — good when the silhouette holds a vertical (a placket, a wrap, a slit) and the fabric doesn't "cling" to the center.
Pants: where the length is best ended
- 7/8 length — gives lightness and a vertical (especially with shoes close in color).
- Full length — elongates the leg line the most (straight/wide styles).
- Be careful with "mid-calf" — this is a strong horizontal exactly where the leg is often wider.
Fabrics and textures
For the apple shape, fabric decides half the fit: whether it drapes and holds its shape, or catches on the center and gathers into folds at the belly. What matters here isn't "fabric names," but behavior while moving: clothing shouldn't cling or sag, but fall evenly and smoothly.
- What usually "gathers" the line: soft fabrics that drape well; knits that hold their shape; dense stretch materials; medium-weight linen/cotton, crepe/crepe wool, dense silk — when the piece doesn't drag at the center and doesn't "cling."
- What more often emphasizes excess: very thin and soft fabric that clings and "settles" into folds right in the middle; and the extremes — too tight or too baggy (both make the center more noticeable).
Sheen/matte: sheen creates a highlight and automatically draws the eye to wherever it is. If you want some shine, it's better placed in details or above/below the center, not directly on the belly.
Colors and prints
Color and print are the same lines, just "drawn" with fabric. For the apple shape, what matters most isn't the color itself, but the contrasting boundary between top and bottom: it creates a horizontal and can place a "stop line" right in the center.
- When a look reads as more put-together: close shades (monochrome/tone-on-tone) or soft contrast — the eye travels along the vertical.
- When the center becomes the main focal point: sharp contrast right at belly level, or a large contrasting print/patch in the middle.
- What usually "holds" shape more easily: a small/medium scattered print or a vertical rhythm (when the pattern doesn't "cut across" the body).
We'll cover contrast, print scale, and "where to place emphasis" in detail in a separate, larger TinDay blog article.
The apple shape isn't "complicated" — it's just sensitive to stop lines. Change the length by 5–10 cm, add a vertical or a diagonal, remove the sheen from the center — and the outfit starts working completely differently. Below is an FAQ to quickly cover common fit and styling situations.
Which print is easiest to style for an “apple” shape?
One that doesn't create a large contrasting patch in the center: a small/medium scattered print or a vertical rhythm. It's critical not to “draw” a horizontal line through the center with strong contrast.
Does monochrome work for an “apple” shape?
Yes, because tone-on-tone reduces the number of “stop lines” and pulls the look into one vertical. The most important thing is not to create a sharp boundary between the top and bottom right at the center.
Which fabrics most often emphasize the belly?
Very thin and soft fabrics that cling and gather in folds at the center, as well as shiny surfaces at belly level — they catch light and automatically draw the eye.
Which pants length best “elongates” the leg?
Often 7/8 length (showing the ankle) or full length. A length ending mid-calf usually creates a strong horizontal line and can make the leg look visually “shorter”.
Which pants rise is better — high or mid?
The guideline is simple: the waistband shouldn't squeeze the belly's widest point or “slide down” while moving. So a higher/stable rise with an even waistband line often works more comfortably, but the key is comfort and no creasing at the center.
Can you wear short blazers and tops?
Yes, but then the “stop line” becomes very noticeable. Such lengths usually work better in outfits where the bottom picks up the proportion (a skirt or cropped/7-8 length pants) and there's no sharp contrast at belly level.
Which top length is most stable for an “apple” shape?
One that doesn't end at the center: either under the bust (empire line in dresses), or an elongated top that passes the belly area and ends below the widest point.
Why does a top seem to fit, but keeps riding up at the belly?
Most often it's a fit imbalance: the piece lacks front length/ease, or the fabric catches at the center. While moving, the piece “rides up”, and the hemline ends up at the widest area.
How do you know a piece “breaks” your proportions because of its length?
If the hem of a top/blazer or a sharp color change stops at belly level or the upper hips — that's a strong “stop line”. It's usually this that creates the feeling of “heaviness in the center”, even if the size fits.