Silhouette in Clothing: How It “Draws” the Figure (and How to Choose Yours in Plus Size)
Reading time 21 min03.01.2026
Why think about silhouette at all
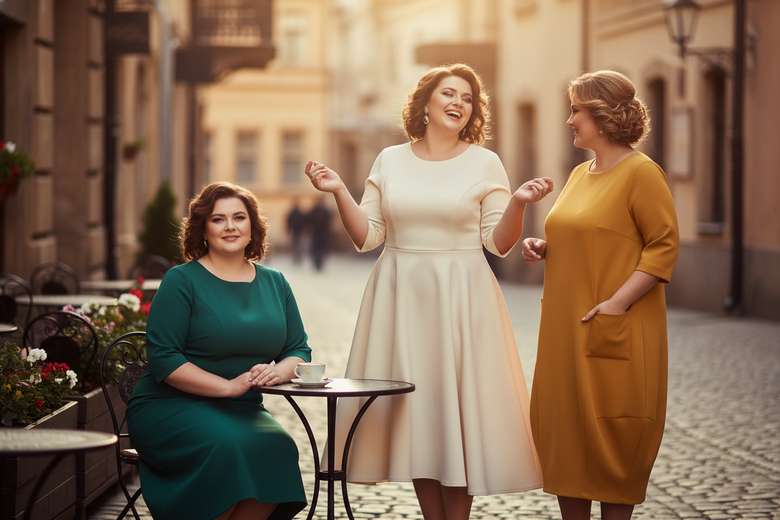
Silhouette is what holds a look “together.” It determines whether a piece looks put-together, gives soft freedom, or emphasizes shape — and most importantly, how it behaves in real life: while moving, sitting, on transit, throughout the day.
In plus size this is an especially practical topic, with no talk of “fixing” anything. A well-built silhouette gives you comfort (doesn't pull at the armhole, doesn't squeeze the waist, doesn't ride up, doesn't make you constantly adjust it) and a clean line (the piece holds its shape and looks neat from the first glance to the last).
Once you start “seeing” silhouette, shopping becomes easier, especially online. You quickly understand where a piece builds in ease, where it places emphasis, and why two dresses of the same size can fit completely differently. Because often it's not about the number on the label, but about what contour the piece creates: straight, semi-fitted, fitted, A-line, or cocoon.
Contents
- What is silhouette in clothing
- 5 silhouette "controls"
- Lines in a silhouette: verticals, horizontals, diagonals
- 6 basic silhouettes (plus size)
- How to choose "your" silhouette: a simple algorithm
- Mini fitting checklist
- Silhouettes by plus size body type
What is silhouette in clothing
Silhouette is the overall outline of a piece on the body: where the shape is wider, where it's narrower, how the length works, and how the look "finishes" at the bottom. That's exactly why a piece can be beautiful on its own but look heavy or "not yours" overall — the contour just doesn't read the way you want it to.
To make silhouette easier to understand, it's more useful not to "guess" by feel but to look at a few key zones. They have the strongest effect on proportions and fit — and we'll show them in the diagram below.
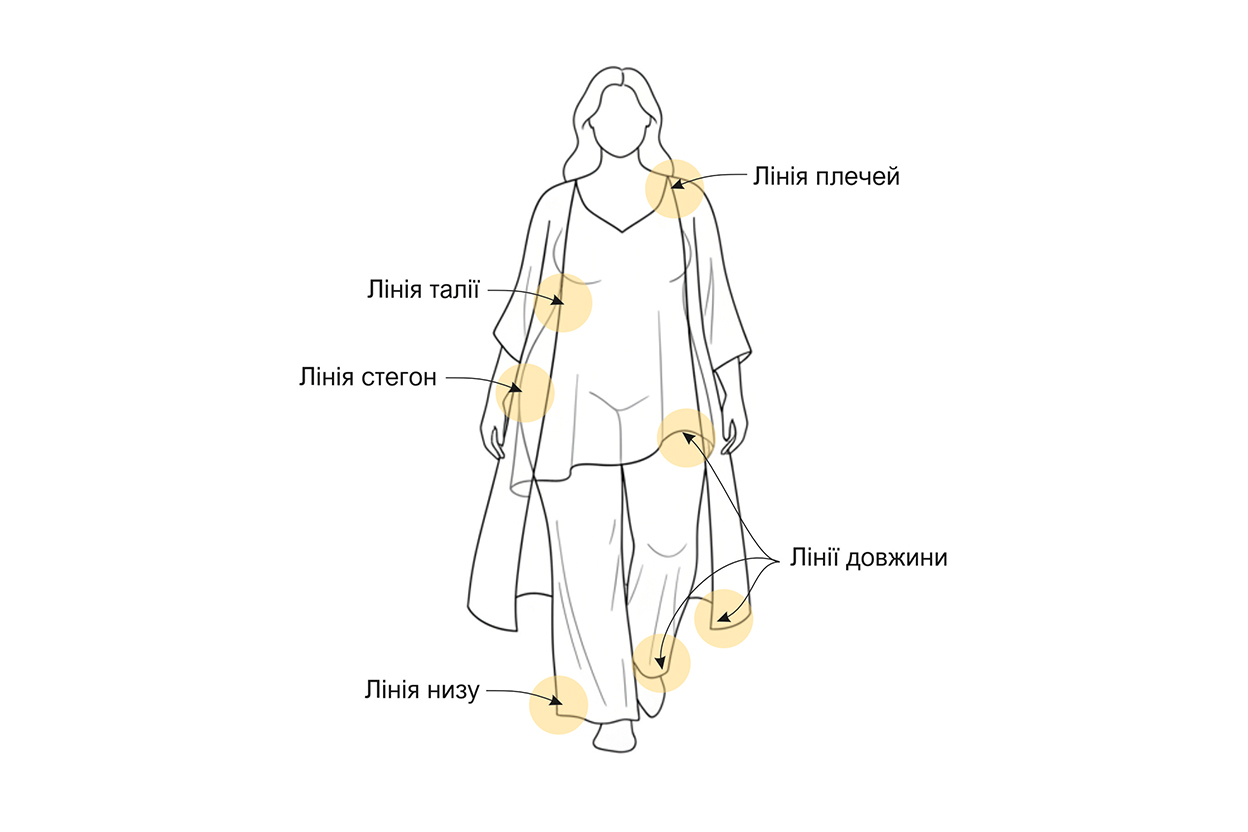
These aren't "rules," but a handy map: it's enough to look at the shoulder line, waist, hips, length, and hemline — and it becomes clear why one piece looks calm and expensive while another seems nice but "not yours."
5 silhouette "controls" that decide almost everything
A silhouette can almost always be "read" through five points. They're responsible not only for how a piece looks, but for how it sits while moving: whether it pulls, twists, or makes you want to constantly adjust it.
- Shoulders (the silhouette's foundation): width, slope, armhole — and most importantly, shoulder balance (how the garment distributes length between front and back and sits on the shoulder blades). When the balance is right, the neckline stays in place, the back doesn't ride up, and the sleeve doesn't twist.
Signs of a problem: the neckline pulls back/forward, it feels "choking" at the front, creases form near the neck/shoulder blades, the back "rides" upward. In plus size this shows up more often, because the upper back is often wider/more curved (shoulder blades, roundness) and the garment needs more room specifically at the back. - Waist (where the center reads): emphasized / not emphasized / soft drawstring / belt / seam shaping. It's important that the waist is controllable and sits "in your place": then the piece doesn't cut up your proportions or drag.
- Hips (how the fabric behaves): clinging / skimming / volume / flaring. In plus size, "skimming" often wins over "zero ease": fewer creases, more freedom of stride, a cleaner line.
- Length (the finishing point): where the top/dress/jacket ends. If the edge lands on the widest point, the contour becomes heavier; shifting it 5–10 cm often instantly "pulls together" the look.
- Hemline (how the shape "finishes"): straight / flared / tapered / rounded. It affects both ease and comfort: a good hemline should allow movement, not break the silhouette while walking.
Quick check: if a piece "seems nice but not mine," usually one control is to blame: the shoulder threw off the balance, the waist sits in the wrong place, the hips lack skimming ease, the length cuts in badly, or the hemline repeats volume where you wanted lightness.
Lines in clothing: how they control silhouette (verticals, horizontals, diagonals)
A silhouette reads like a route for the eye. Lines in clothing determine where the gaze travels (up-down, sideways, diagonally) and where it stops. That's exactly why two pieces of the same size can give completely different effects: one "gathers" the contour and looks calm, another breaks the figure into parts or adds width where you don't want it.
In plus size this effect is more noticeable, because the body has more volume and curve: fabric and seams react more strongly to curves, and lines become "accents" faster. This isn't about something being "off-limits" — it's about the fact that a line always emphasizes something.
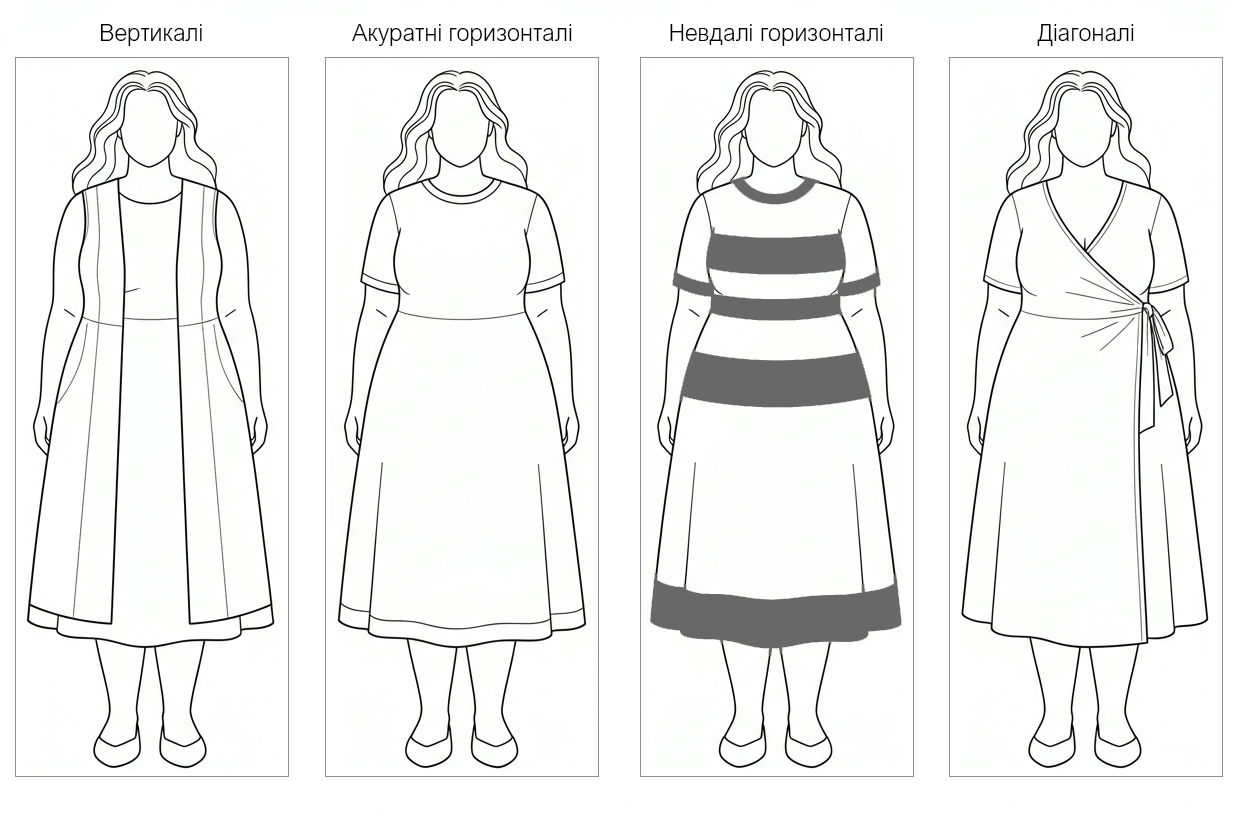
Verticals: elongate and "gather" the contour
A vertical line leads the eye from top to bottom and creates a sense of wholeness — as if the silhouette reads as a single column. It doesn't "hide" the shape, it organizes it: fewer visual stops, a more even rhythm.
- Strong verticals: an open shirt/cardigan/coat, a button placket, a zipper, long seam lines, contrasting side panels.
- Soft verticals: long pleats, stitching lines, fabric drape, elongated accessories (a scarf, a pendant).
- Why it works: the eye glides without catching on width — the silhouette feels more "gathered," and proportions look elongated.
An important nuance: a vertical matters only as long as it's not cut across by strong contrast or a wide horizontal. When a sharp "bar" appears in the middle (for example, a belt or a sharp color block), the eye's route is interrupted.
Horizontals: mark "levels" and add width where they pass
A horizontal line works like a visual shelf: it emphasizes a level and widens it. This can be very beautiful if the line sits where you want emphasis, and very harsh if it crosses the widest zone.
Three things affect the strength of a horizontal: placement (exactly where it crosses), thickness (a thin trim or a wide band), and contrast (the more contrasting, the more it "cuts" the silhouette).
- Neat horizontals are usually thin lines at narrow points: the neckline, cuffs, sleeve edge, hem where the leg/arm is narrower. They give a finished, clean look.
- Problematic horizontals are wide belts/stripes/inserts at the level of the fullest bust, belly, hips, or when the length ends at the leg's widest point (calf). In plus size this is immediately read as "cutting across" and adding volume.
A separate point about length: the hem of a dress/skirt is also a horizontal. It's not neutral. If the hem lands on the widest point (for example, the calf), the eye "stops" there and emphasizes the width. If the hem is shifted higher or lower, the silhouette reads more calmly.
Diagonals: direction, movement, and "shifting" emphasis
A diagonal line leads the eye along a trajectory — and that's why it often works more gently than a horizontal: it doesn't "cut off," it redirects attention and adds dynamics. Diagonals are good at "breaking up" solidity, especially when you want lightness in a look without a bare vertical.
- Examples of diagonals: a wrap, a crossover, an asymmetric hem, a diagonal placket, a bias cut, a cross-body strap, lapels.
- What matters: a diagonal should "lead" — not point at the widest zone. When a diagonal ends right at the belly/hips and creates a knot/bunch of fabric there, it becomes a marker of that point.
Curves and rounding: softness + extra volume in the arc zone
Rounded lines (cocoon shapes, a rounded hem, soft "half-circle" cuts) add softness and "hug" the silhouette. But a curve almost always creates a sense of volume wherever it passes. So curved lines work best when they're either supported by verticals or held together by a calm base without unnecessary stops.
In simple terms: verticals "gather," horizontals "mark and widen," diagonals "lead," rounding "softens and adds volume." Once you see this in clothing, it becomes clear why one piece works effortlessly and another looks heavier — even before you try it on.
Caption under the illustration (short): Verticals elongate the contour; horizontals act as "stops" and emphasize a level; diagonals add movement and shift emphasis more gently.
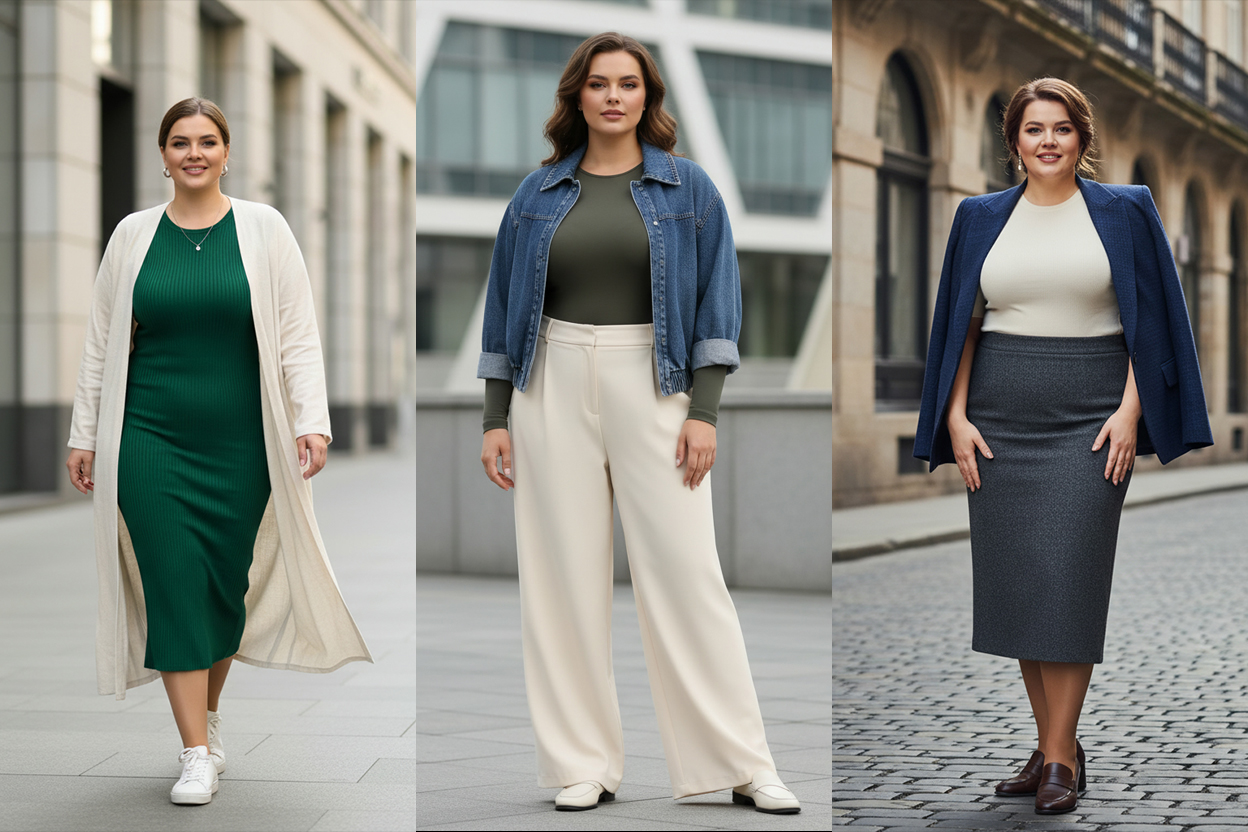
6 basic silhouettes and how they work in plus size
Silhouettes aren't fashion buzzwords or a "correctness chart." They're six basic shapes that help you predict how a piece will sit on the body before you even buy it. In plus size this is especially useful, because clothing needs to work not just in the mirror, but in life: while moving, on transit, sitting, all day. It's often the silhouette that decides whether you'll feel calm and comfortable, or whether you'll have to constantly pull, adjust, and think about the piece instead of just living.
Important: none of these six silhouettes is "better" or "worse." They serve different purposes. One silhouette gives maximum freedom, another gives clean structure, a third emphasizes the waist or a clear shape contour. Sometimes you want one today and something completely different tomorrow — that's normal. Silhouette is a tool that adapts to you, your mood, your day, and your comfort.
Next, we'll break down each silhouette the same way: what it looks like, where it gives freedom, what makes the line beautiful, and how to put together a look so it looks modern. Read this like a toolkit: take what works for you, and calmly ignore what isn't yours.
Below are tools, not prohibitions. Your best silhouette is the one in which you like yourself and can live your day, rather than "carry your clothes around."
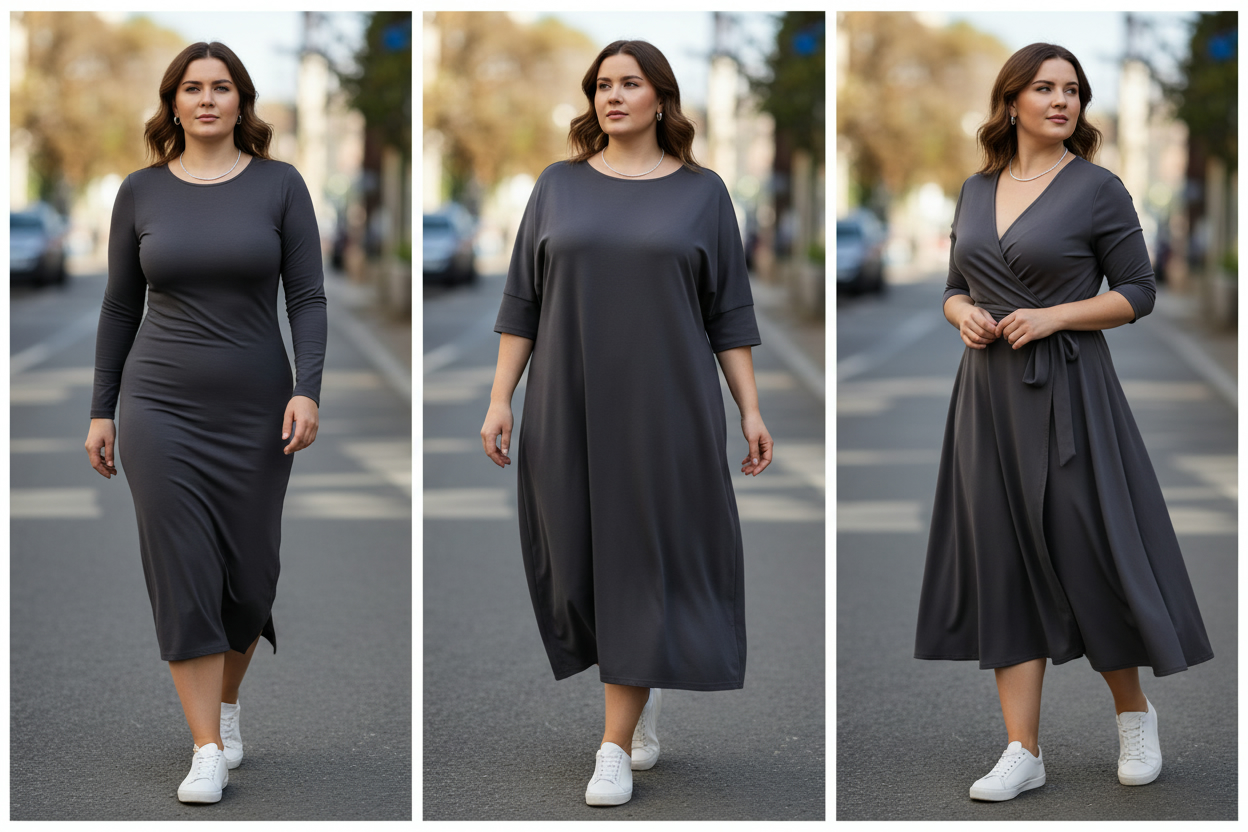
1) Fitted silhouette (as close to the body as possible)
What it looks like: clothing follows the line of the bust, waist, and hips, with almost no "air" between body and fabric. This is a silhouette that doesn't mask or "correct" shape — it shows it. That's exactly why on plus size it can look very striking… or very unfortunate, if the piece is chosen too tight.
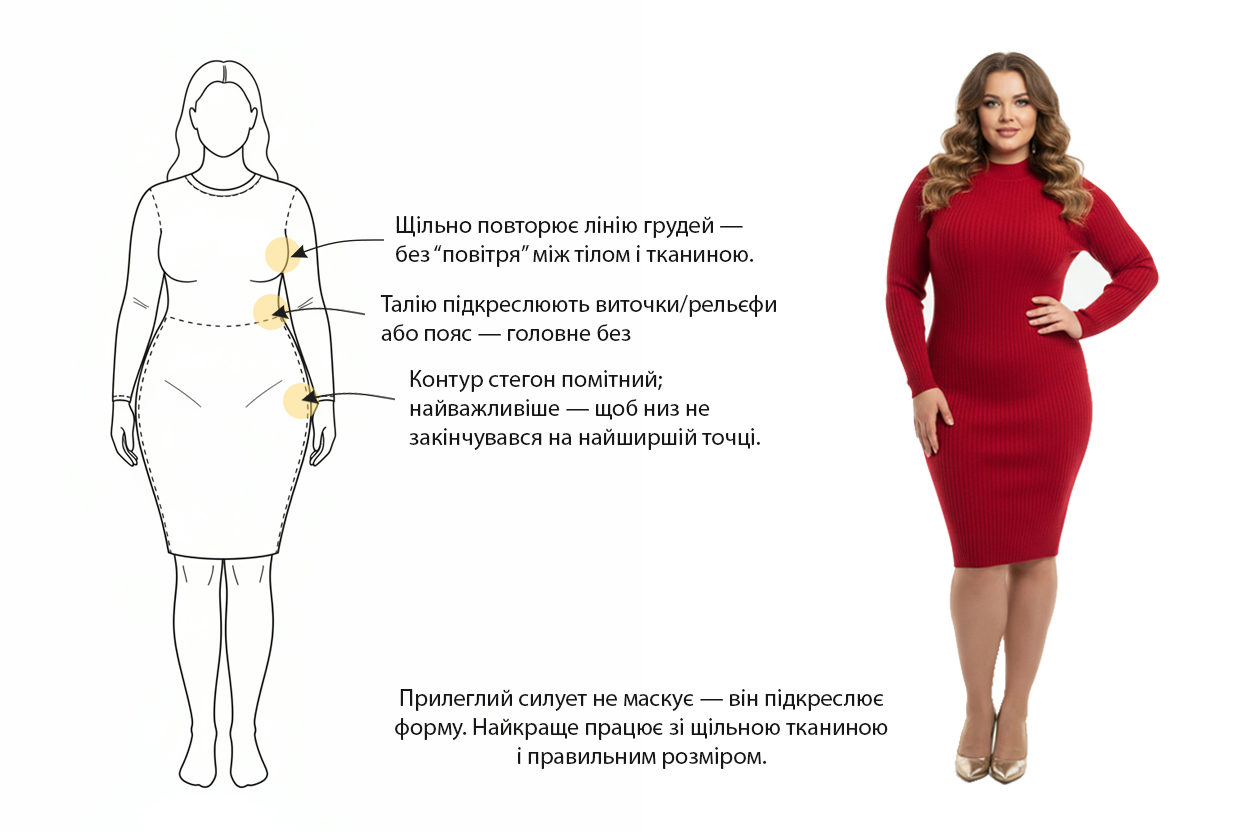
A fitted silhouette in plus size looks very striking, but only when the piece fits properly rather than "too tight." That means the fabric holds its shape, the size is honestly chosen, and you can move comfortably instead of constantly wanting to adjust yourself.
In practice, a fitted silhouette most often shows up as a knit midi dress or a fitted top that creates a clear contour. And it's exactly because of that contour that it's either a "wow" or "not mine." The difference is almost always not about the figure, but about three things: fabric, size, and length.
When to choose it
- when you want to emphasize your shape and like a clear contour;
- when the fabric is dense and smooth, not thin and "clingy";
- when you're planning to style it with a vertical (a third layer, a placket, a V-line, seams).
What makes a fitted silhouette beautiful (and not "too tight")
- Fabric density: it should hold the line, smooth the surface, not be sheer, and not "stick."
- Verticals: seam lines, a placket, a V-neckline, or an open third layer make the look lighter.
- Length: midi often looks more put-together than mini, and works even better paired with simple shoes.
If it "didn't sit right," the reason is usually here
- the size is too small "to pull it in" (creates tension creases and discomfort);
- thin knit that shows everything underneath;
- the length ended at the widest point and "cut off" the proportions.
Pros and nuances
Pros: a fitted silhouette quickly "pulls together" a look, looks modern, and doesn't require complex styling. It's a strong base, especially if you add a vertical with an outer layer.
Nuances: it's honest about fabric and size. If the material is thin or the piece is too tight, it shows immediately in tension creases and discomfort. So here it's better to play with fabric quality and the right fit, not "a size smaller."
Which pieces are usually fitted
Mini and midi dresses in dense knit, fitted long-sleeve tops and turtlenecks, midi skirts, tops as a base under a blazer or shirt, "top+bottom" sets where the top creates the clear contour.
In which styles fitted looks modern
Urban minimalism (a fitted base + a straight outer layer), casual (a fitted top + wide/straight pants), a more put-together everyday style (a fitted top + midi + a blazer along the line, not skin-tight).
3 outfit formulas
- a midi dress + an elongated shirt/cardigan worn open (vertical) + sneakers;
- a fitted long-sleeve top + straight pants/palazzo + a light jacket with a "calm" shoulder;
- a fitted top + a midi skirt + a structured blazer (not skin-tight, but along the line).
2) Semi-fitted silhouette
What it looks like: clothing follows the line of the bust and waist, but doesn't cling to the body "skin-tight." There's a small amount of ease between the figure and the fabric — so the contour reads clearly while the feeling stays comfortable.
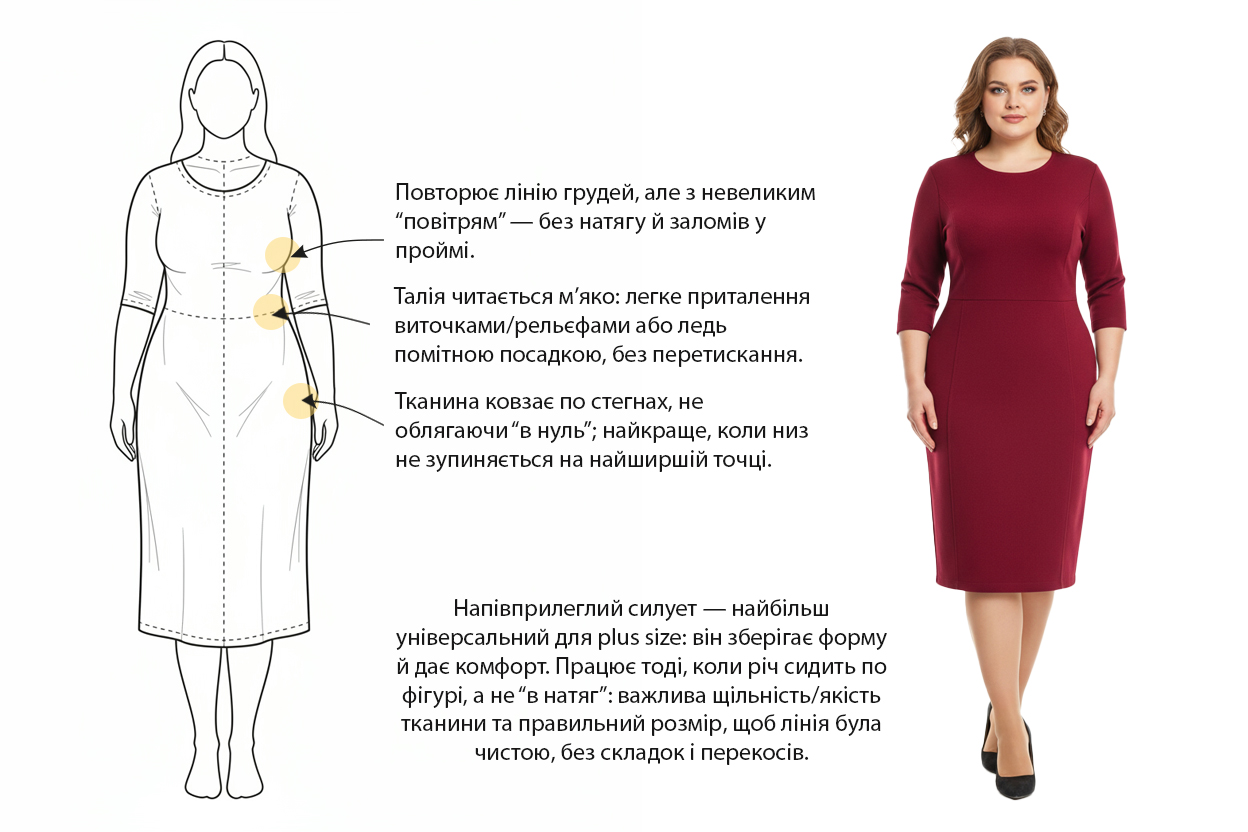
Why this is the most versatile silhouette for plus size
Semi-fitted is the "golden middle": it preserves shape (the figure isn't hidden), but also doesn't demand a perfect cling like fully fitted pieces. In real life this means a simple thing: it's easier to move, easier to breathe, less risk of creasing and "binding" while moving — and the silhouette still looks put-together.
When to choose it
- when you want to emphasize your shape but without highlighting every body detail;
- when you need "everyday" clothing: work, the city, meetings, travel;
- when bust fit matters, but you don't want a tight feeling at the waist and hips.
Pros
- Comfort while moving: the fabric doesn't pull or "jump" upward.
- A neat line: fewer creases at the belly/hips than in a fully fitted silhouette.
- Easy to style: works well in minimalism, casual, and smart-casual alike.
Risks (if the piece is chosen poorly)
- Too large a size makes the silhouette "baggy" and adds volume where it's not needed.
- Too thin/clingy a fabric turns semi-fitted back into "too tight."
- A poor length (when the hem ends at the widest point) can visually widen.
What makes a semi-fitted silhouette look "expensive"
- The right shoulder (no excess volume, but no squeezing at the armhole either).
- A soft waist: darts/seam shaping/a light waist definition instead of a hard cinch.
- An even line over the hips: the fabric skims rather than clings "skin-tight."
- Verticals: seam lines, a placket, elongated lines, an open third layer.
Which pieces are usually in this silhouette
Midi dresses with a light waist definition, knit sheath dresses "fitted without tension," blouses and long-sleeve tops with the right length (not ending at the widest point), straight-line blazers/coats with a soft fit, "top+bottom" sets where the top doesn't cling.
3 outfit formulas
- A semi-fitted midi dress + a straight coat/jacket + comfortable shoes (sneakers/loafers).
- A semi-fitted long-sleeve top + straight pants/palazzo + an open shirt (vertical).
- A semi-fitted top + high-rise jeans + a vest/cardigan as a third layer.
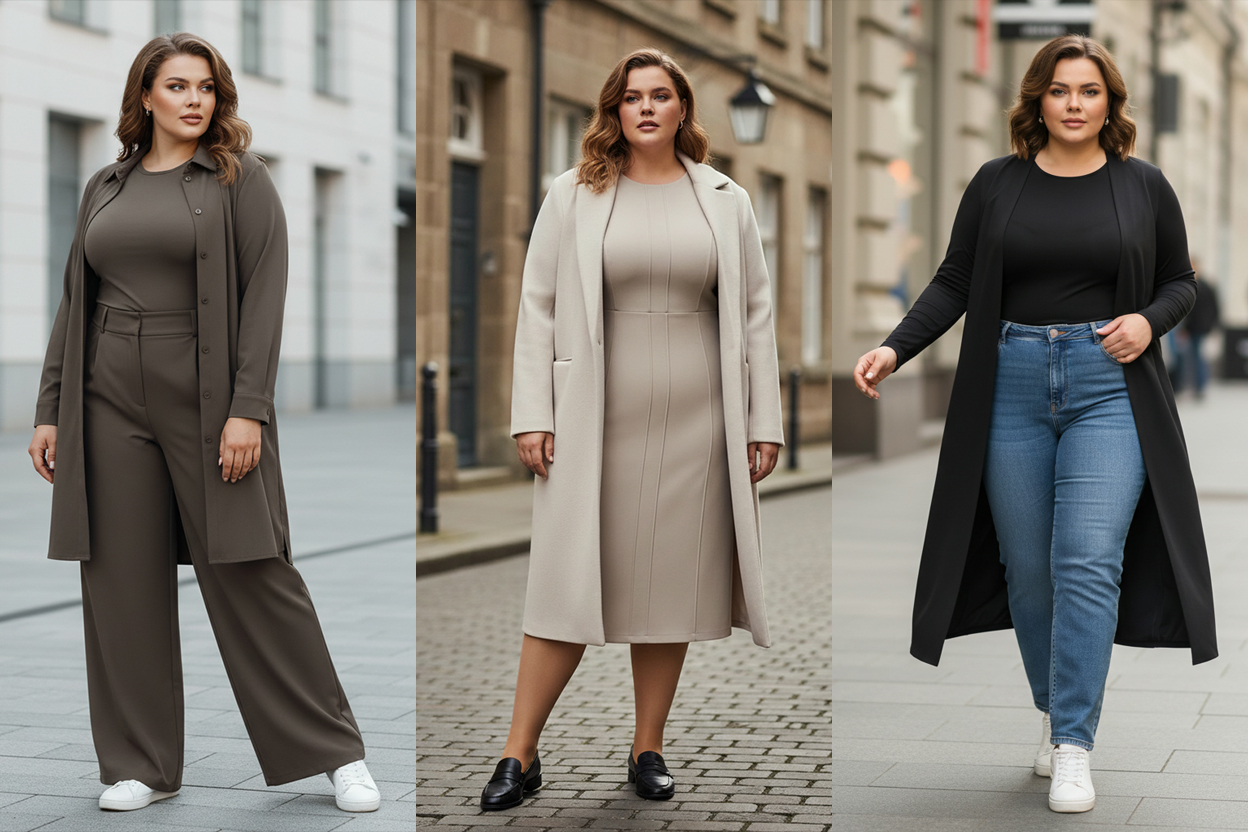
3) Defined-waist silhouette (waist emphasis: belt / drawstring / cut)
What it looks like: the waist is defined through the cut, a belt, or a drawstring adjustment. The top and bottom can be different in volume: for example, a softer top + straight pants, or a dress that sits more loosely over the hips but has a "gathering point" at the waist.
Key idea: waist definition should sit wherever is comfortable for you. In plus size the waist often "floats" (due to the belly, bra fit, bust and hip proportions) — and that's normal. The right waist definition adds lightness and structure, not the urge to take the piece off after an hour.

A defined-waist silhouette isn't about "cinching in" — it's about setting a shape. It's best when the emphasis is adjustable: today you want it more defined — pull it in; tomorrow you want it calmer — loosen it. That's exactly why a drawstring or a soft belt often looks more natural than a stiff leather belt.
When to choose it
- when you want to visually pull the look together and emphasize proportions;
- when you love "a waist in the look," but without tightness across the belly;
- when you need to balance the top and bottom (for example, to make the silhouette lighter in the center).
Pros
- Structure without stiffness: the silhouette becomes more defined without requiring a maximally body-hugging fit.
- Proportions read better: a "center" appears, and the look feels more deliberate.
- Easy to adapt to mood and day: the waist definition can be made stronger or softer.
Risks (if done poorly)
- Over-cinching creates creases, a "roll," and discomfort — especially while sitting.
- A poorly placed waistline (too low, or at the belly's widest point) can visually weigh down the center.
- An equally heavy top and bottom + a belt = a feeling of "overload" (it's better for one of the layers to be calmer).
How to emphasize the waist softly
- A drawstring or soft belt (preferably wider and pliable, without a tight cinch);
- Seam shaping/darts or cut lines — instead of a "tight belt";
- A knot or side tie (often looks lighter than centered straight on);
- Balance: if the waist is defined, the top or bottom shouldn't be equally "heavy" in volume and detail.
Which pieces are usually defined-waist
Wrap dresses and dresses with a soft belt, shirt dresses with a belt, blazers/coats with a belt, parkas and jackets with a waist drawstring, high-rise sets (where the waist reads through the rise), and a "third layer" (a shirt/cardigan/blazer) left open and supporting verticals.
In which styles it works best
- Casual / urban style: a jacket with a drawstring + straight pants + sneakers.
- Smart-casual: a dress with a soft belt + a straight coat/cardigan + loafers/pumps.
- Minimalism: a monochrome set + a waist emphasis without extra detail.
3 outfit formulas:
- a jacket with a drawstring + straight pants + comfortable shoes;
- a dress with a soft belt + a long cardigan worn open;
- a top + high-rise pants + a shirt/blazer (emphasis through the rise).
4) Straight silhouette (column)
What it looks like: the clothing falls in an almost straight line from shoulders to hem — without waist emphasis. This is a silhouette about a "clean vertical": it gives a sense of calm, structure, and modern simplicity.
Key idea: a straight silhouette in plus size doesn't work as "hiding" — it works as pulling the look together into an even line. When the fabric holds its shape, the shoulders look neat, and the length is chosen well, the "column" visually elongates and looks very expensive.
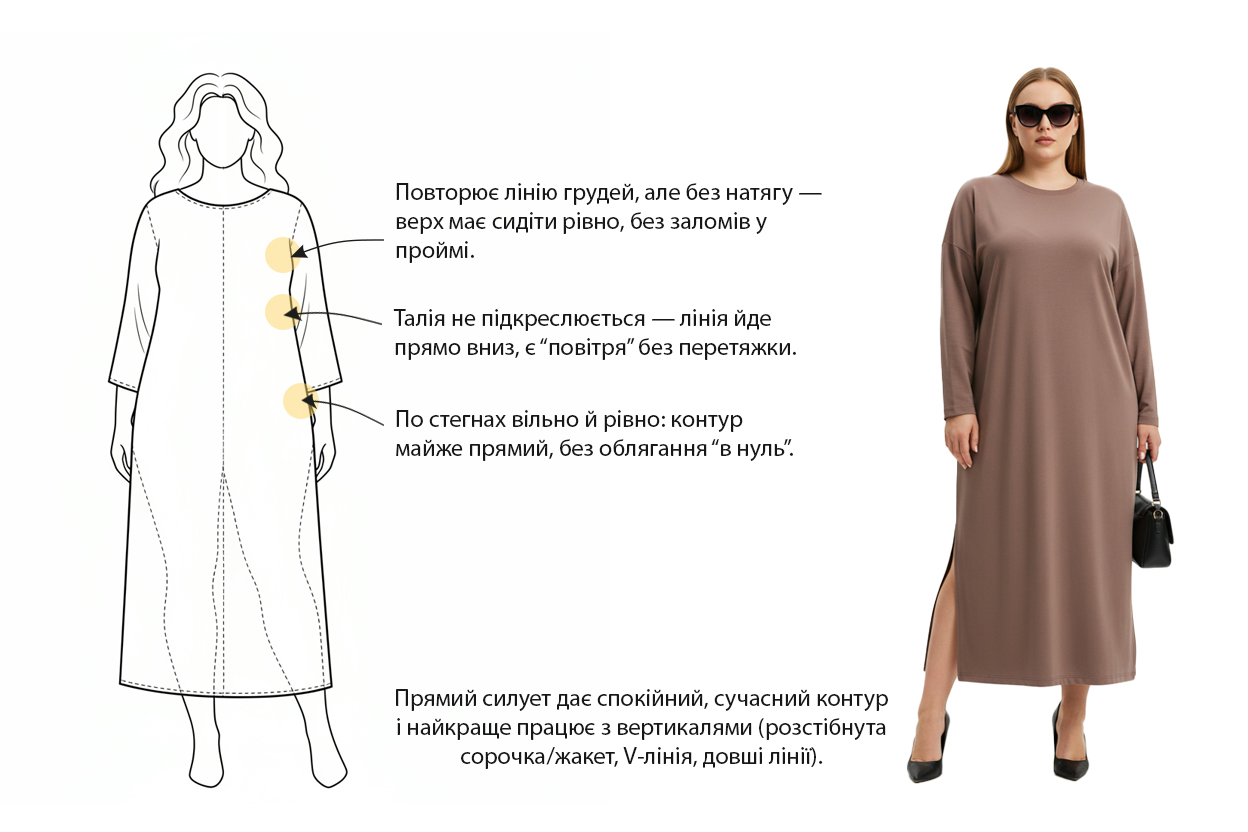
Fit explanation (how to read this silhouette):
- Bust: the line reads evenly — without tension at the armhole or "skewing" at the front panel.
- Waist: not emphasized — the fabric falls calmly, without dragging or "dart creases."
- Hips: there's free room for stride; ideal when the hem doesn't catch or gather into folds.
- Conclusion: this is the best silhouette for clean, "put-together" looks — but it needs the right fabric and a neat shoulder line.
Pros: elongates the silhouette through the vertical, looks minimalist and modern, easy to build into a capsule.
Possible drawback: if the piece is too soft or too short, it can "turn into a box," and if too narrow, it can highlight every crease of movement.
What most often ruins a straight silhouette:
- thin knit that "clings" and shows everything underneath;
- drooping shoulders/too soft a top (the silhouette becomes "homewear-like");
- a length that ends at the widest point (hips or calf) without a vertical to compensate.
3 adjustments so a straight silhouette doesn't turn into a "box":
- Vertical: an open shirt/cardigan/vest, or a long placket/border line.
- Length: midi or below the knee is better; if there's a "risky" point, add a slit or a vertical up top.
- Shoulders: either structured or soft, but neat (no "drooping" and no excess width).
Where this is found most often: column dresses and sheath dresses without a waist, straight tunics, shirt dresses, straight cardigans/vests, straight-cut coats, minimalist suits.
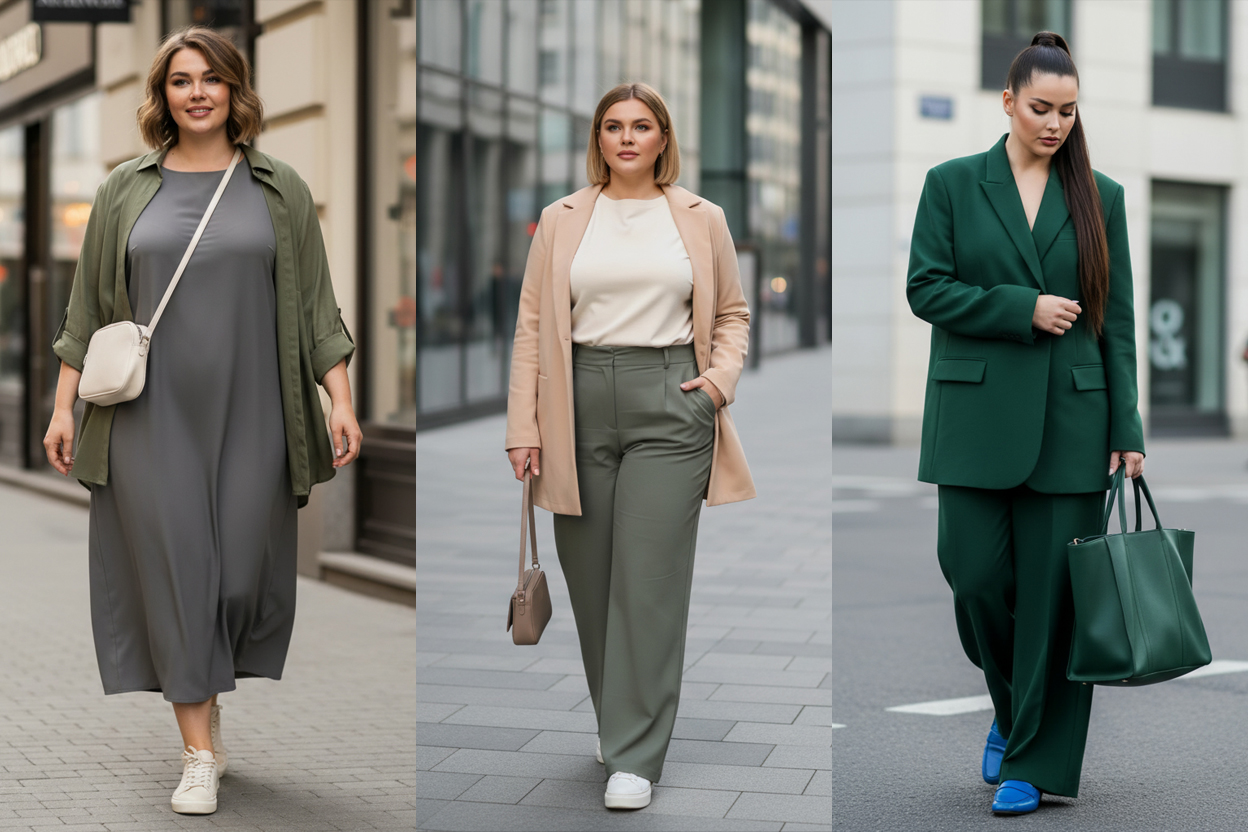
3 outfit formulas:
- a straight midi dress + a long shirt/cardigan worn open + sneakers;
- a straight top + palazzo + a light straight-cut jacket (a clean shoulder line);
- a straight set + one accent (shoes or a bag), instead of "a lot of everything."
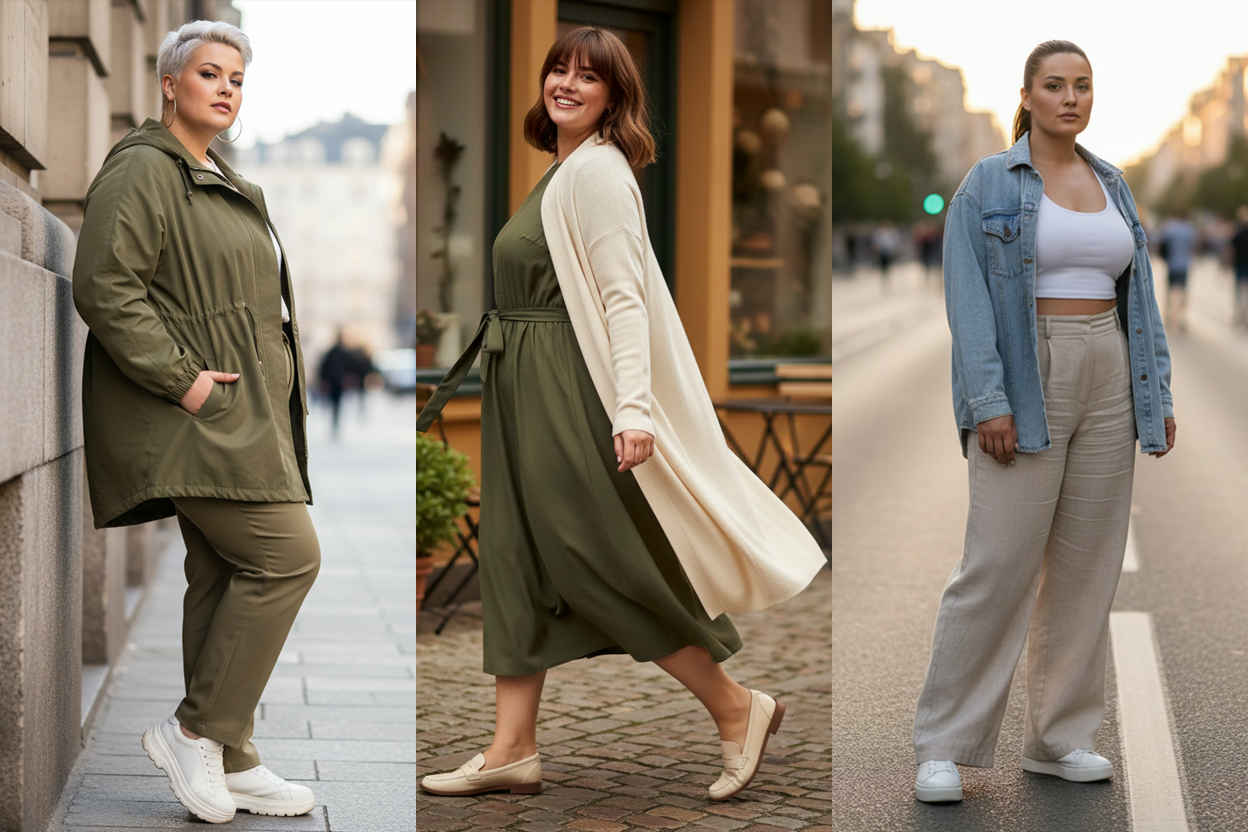
5) A-line / "trapeze" (widening toward the bottom)
What it looks like: the top sits neatly at the shoulders and bust, and then the shape gradually opens up toward the bottom. This is the silhouette where freedom of movement is felt the most: the fabric doesn't "catch" on the belly and hips, but works like a soft line that drapes beautifully downward.
Key idea: an A-line doesn't "mask everything in a row" — it shifts the emphasis to the top (face, shoulders, neckline) and gives "air" exactly where plus size most often wants comfort (belly/hips). So it can look very light and modern — but only if the top isn't overloaded and the flare is moderate.
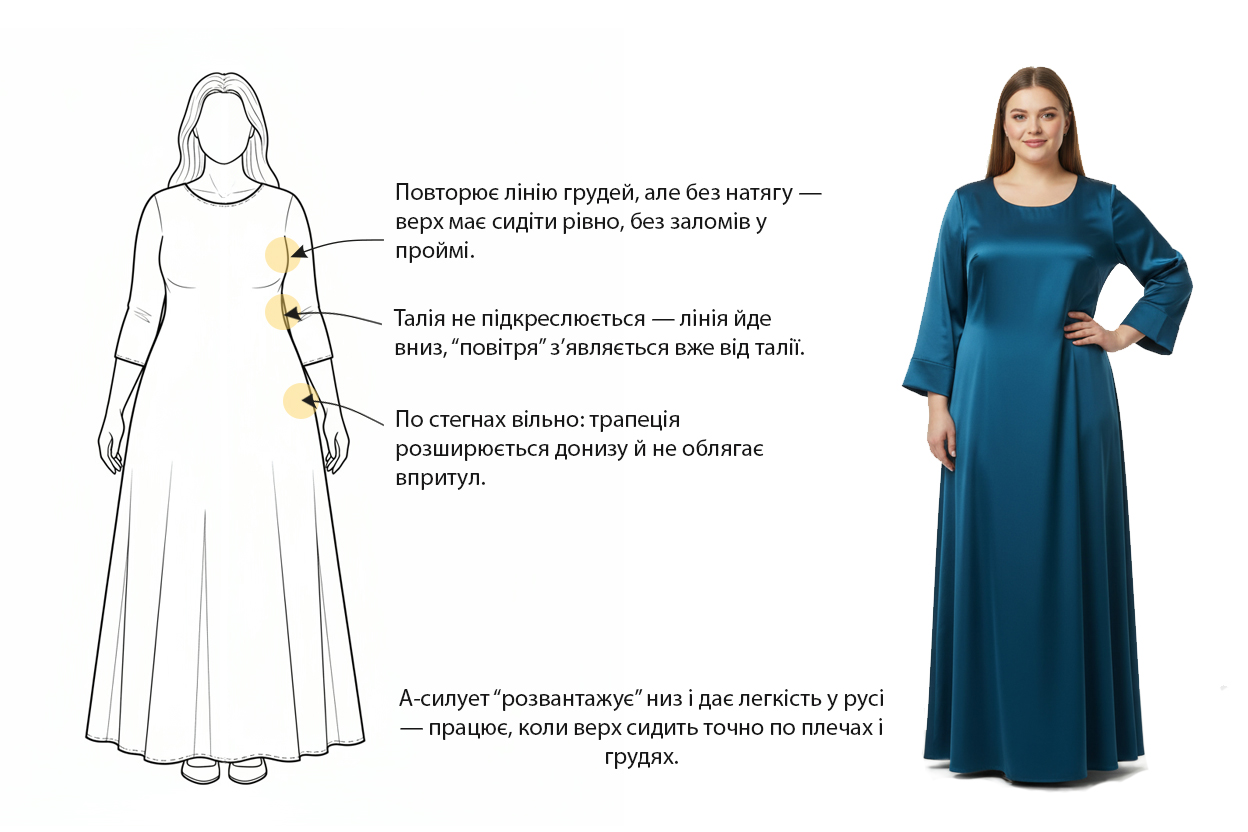
Bust: the top follows the bust line softly, without tension. The most important thing here is the armhole and shoulder fit: if they sit evenly, the silhouette looks put-together even in a loose cut.
Waist: the waist isn't emphasized (or reads very subtly) — the line flows downward, and "air" appears from the bust/under the bust or from the armhole. This is exactly what gives a feeling of lightness and removes the urge to "adjust" the piece every 5 minutes.
Hips: free at the hips: the trapeze moves away from the body and doesn't cling tightly. So the hip contour becomes less "rigid," and the look becomes smoother. This is one of the most comfortable silhouettes for walking and sitting.
Conclusion: the A-line is a "light bottom" with a clean, modern contour. It's especially nice when you want comfort at the belly/hips while still keeping the look put-together thanks to a neat top.
Who usually likes it the most:
- those who want freedom at the hips/belly without a "sack" feeling;
- if the hips are wider or there's a pronounced belly area, an A-line gives comfort and movement;
- if you want to show off the top (shoulders/bust) more — the silhouette naturally places emphasis there.
Pros of an A-line:
- Comfort: nothing squeezes or "sticks" to the hips/belly.
- Movement: the fabric works beautifully while walking, especially in midi/maxi.
- Versatility: easy to style from casual to a more "put-together" look (shoes and the outer layer decide it all).
Possible drawbacks (so you're not disappointed):
- too strong a flare can add volume at the bottom and make the look heavier;
- if the top is also very wide (oversize + oversize), the silhouette becomes "shapeless";
- thin fabric with no weight can "stand out like a bell" or crease — you need the right fabric drape.
For an A-line to look modern (not a "frumpy trapeze"):
- Moderate flare — less is more, as long as the line is clean;
- A neat top (shoulder/armhole/neckline) — this is the silhouette's "frame";
- Verticals: a V-neckline, a placket, a long accessory, an open outer layer;
- The right length: midi is the most versatile; maxi looks very striking if there's a vertical and it doesn't "eat" your height.
About fabrics (this matters): an A-line loves materials that either drape or softly hold their shape. If you're making an example out of satin/sateen, it's perfect for a "fluid" line: the fabric gives movement and looks more expensive. But it's better when the satin is denser or lined, so the bottom doesn't "cling" or show through.
Which pieces are usually in this silhouette:
- midi/maxi trapeze dresses (with pockets, a placket, a V-neckline);
- A-line tunics (especially great with straight pants);
- shirts/blouses that widen toward the bottom (better with a defined shoulder);
- A-line coats/raincoats (these really "pull together" a plus size look).
In which styles an A-line looks strongest:
- Casual / urban minimalism: clean lines, monochrome, sneakers/loafers, a structured bag.
- Romantic: soft fabrics, delicate sheen (satin/sateen), feminine shoes.
- Boho (with care): works if the top isn't overloaded and a vertical is kept (a placket/V).
- Office: an A-line dress + a short blazer/cardigan with a straight line, no "sloppy" shoulders.
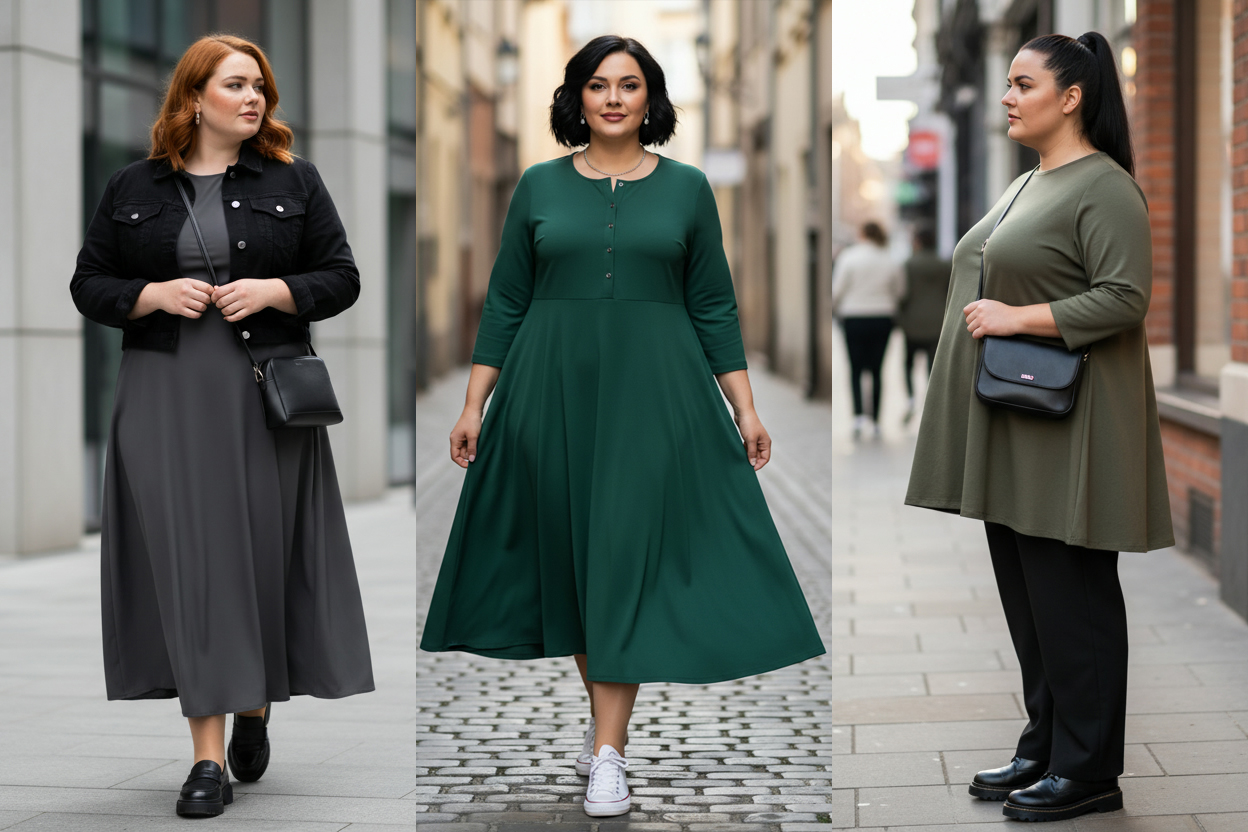
3 outfit formulas:
- an A-line midi dress + a shorter jacket/coat (balanced lengths) + shoes with a clear shape;
- an A-line tunic + straight pants + a structured bag (to add "put-togetherness");
- an A-line + a V-neckline/placket/long vertical (an open outer layer or a long chain accessory).
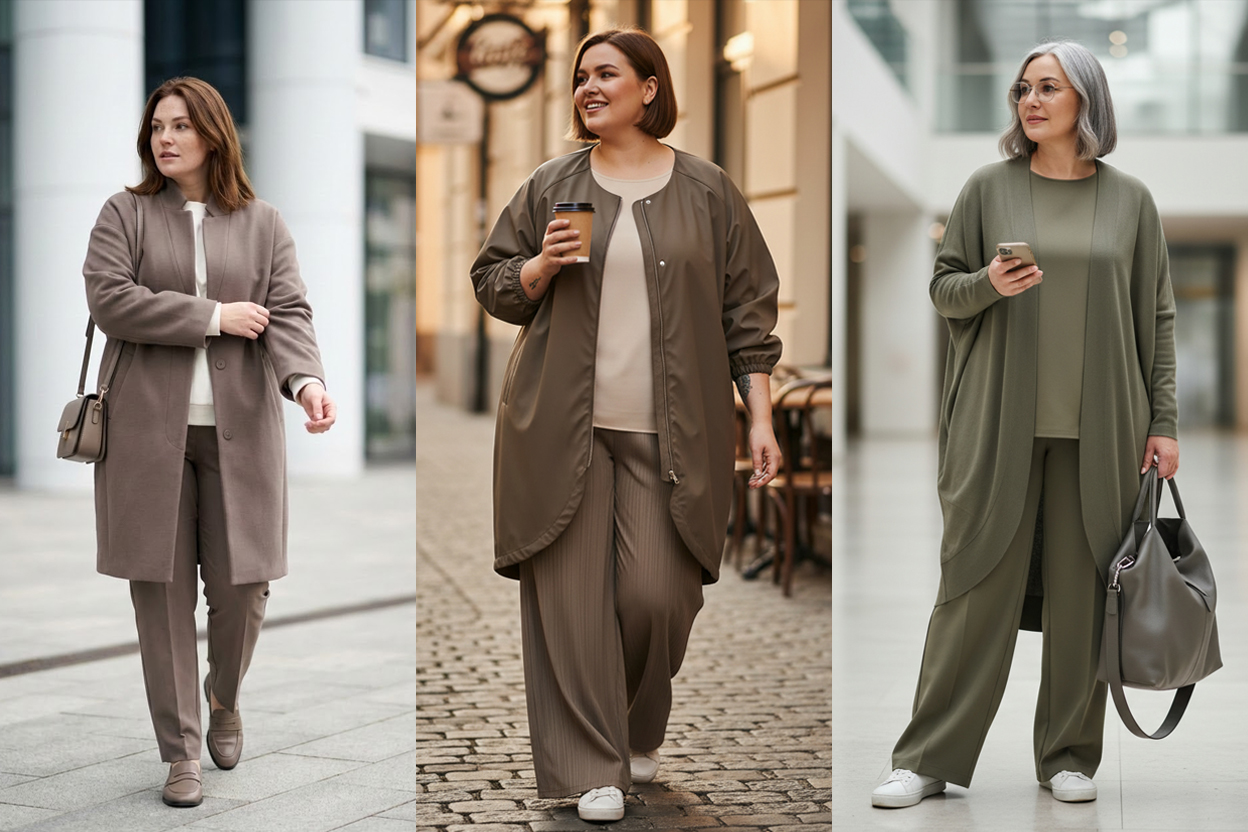
6) Oval / cocoon (rounded volume with a slight taper toward the bottom)
What it looks like: the shoulders are softer and rounded, there's volume in the center, and toward the bottom the silhouette usually tapers slightly. The "cocoon" most often lives in outerwear and layering: that's exactly where it gives that same "hug" effect and softness.
Key idea: a cocoon looks lighter when the outside has volume and the inside has an even, gathered line. In other words, we don't do "volume on volume" — we balance it with simple, straighter layers underneath.
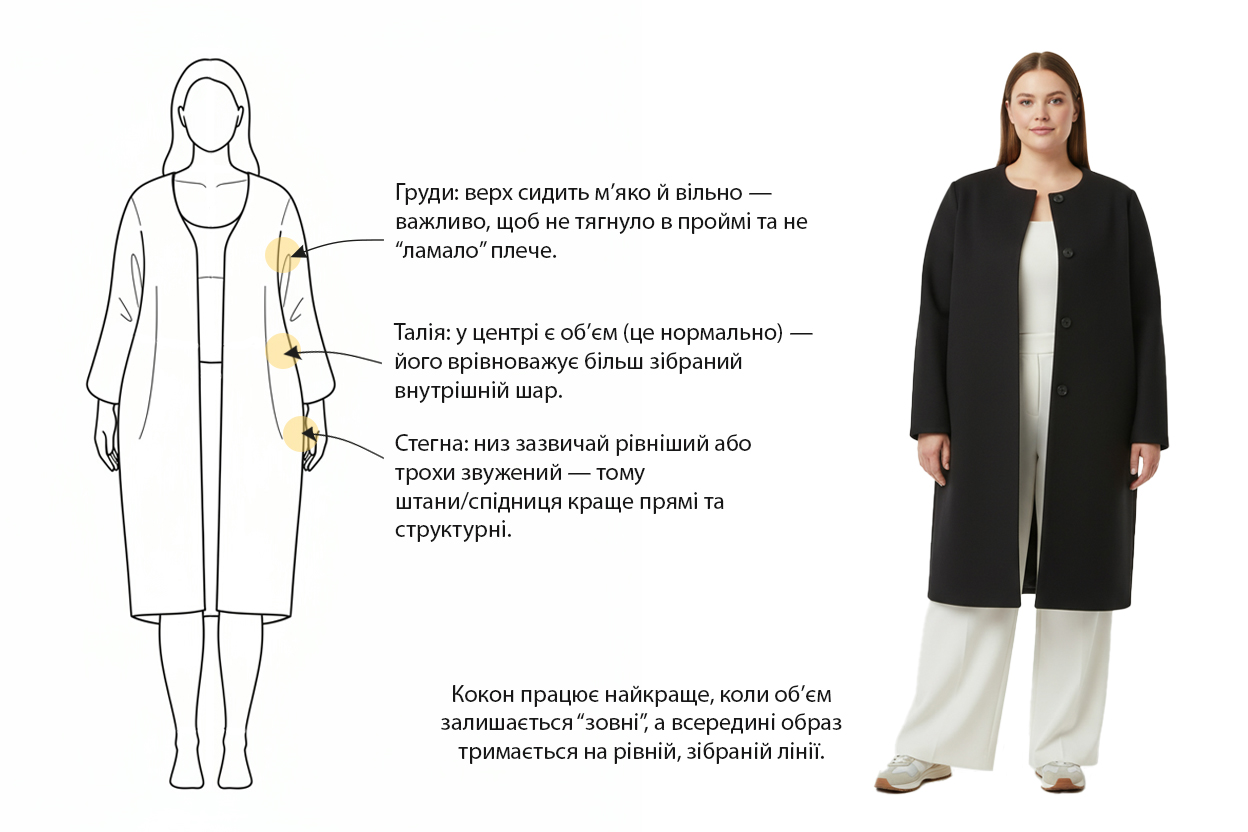
Bust: the top of a cocoon sits softly, without a rigid "frame"; what matters is that the armhole doesn't pull and the shoulder doesn't droop.
Waist/center: volume often falls right at the center — it gives comfort and softness but needs a "gathered" inner layer.
Hips/bottom: the bottom either holds a more even line or tapers slightly — so it's better to keep the legs and the bottom of the look simple and structured.
Conclusion: a cocoon works when the volume is "outside," and the line underneath it is calm and vertical.
Who a cocoon usually suits the most:
- when you want softness and comfort in the center (belly/waist) without a "sack" feeling;
- for layered looks, when you need to beautifully "pull together" outerwear;
- when you like modern volume and simple lines without rigid waist definition.
Pros:
- adds stylish, modern volume and looks very "expensive" in outerwear;
- comfortable while moving and in the center zone;
- easily saves a look in the cool season: the silhouette already "makes the style" on its own.
Possible drawbacks:
- if the inside is also voluminous, the cocoon can visually weigh you down;
- too soft a fabric makes the silhouette "shapeless";
- the wrong bottom (wide + soft) repeats the volume and makes the look heavier.
So a cocoon doesn't weigh you down:
- inside — a more gathered layer (straight or semi-fitted), to hold the vertical;
- bottom — straight/structured, so it doesn't repeat the volume from above;
- add a vertical (a placket, a V-line, an open layer) — it "removes" the feeling of bulk.
About fabrics: a cocoon loves materials that hold their shape or have weight: then the volume looks controlled. Fabrics that are too thin and "clingy" make the silhouette look accidental.
3 outfit formulas:
- a cocoon coat + straight pants + a dense long-sleeve top;
- a cocoon jacket + palazzo + a simple top with no volume at the shoulders;
- a cocoon cardigan + a monochrome "top+bottom" set (one continuous vertical).
How to choose "your" silhouette: a simple algorithm
Instead of complicated tests — three questions. They quickly "highlight" your most comfortable silhouettes.
1) Where do you need the most freedom?
- Belly/waist: semi-fitted, A-line; in outerwear — cocoon or straight with a vertical.
- Hips: semi-fitted, straight, A-line (better with fabric that drapes).
- Shoulders/bust: a straight/semi-fitted top with no extra detail at the shoulders; balanced by the bottom.
2) Do you want to emphasize the waist or keep the silhouette more even?
- Emphasize: defined-waist (preferably adjustable), semi-fitted.
- More even: straight, A-line, cocoon.
3) What "mood" do you usually want for your look?
- Soft/feminine: defined-waist, A-line.
- Urban/calm: straight, semi-fitted, cocoon.
- Expressive: fitted or semi-fitted with an accent.
Mini fitting checklist: "did the silhouette sit right?"
- The shoulders don't pull and haven't "shifted backward."
- There are no horizontal tension creases at the bust/hips.
- The hem doesn't ride up while walking.
- You can sit down, raise your arms, take a step — and the clothing doesn't "jump" dramatically.
- Most importantly: you don't feel like adjusting yourself the whole time.
Silhouettes by plus size body type
Body type tells you where your composition "leads" (top, center, or bottom), and silhouette helps support that composition with clothing so it sits comfortably and looks put-together.
A detailed breakdown of body types with a test and measurements is here: Body Types in Plus Size: Test + Proportions. Below is a short cheat sheet of which silhouettes are the best starting point.
- Apple (O): semi-fitted, A-line, straight + verticals. Goal: give "air" in the center and elongate the line.
- Pear (A): semi-fitted, softly defined-waist, straight with an accent up top. Goal: balance the top and not weigh down the bottom.
- Hourglass (X): defined-waist, semi-fitted; fitted if you want a clear contour. Goal: support the waist without it being "too tight."
- Rectangle (H): straight + layering, semi-fitted; cocoon in outerwear. Goal: add structure and rhythm to the look with layers.
- Inverted triangle (T): a straight or semi-fitted top with no extra "weight" at the shoulders + a bottom with shape. Goal: don't reinforce the shoulders, and add balance to the lower part.
Important: these aren't rigid rules. In plus size there are often mixes, so go by the two closest types and choose what gives you comfort while moving and what you like in the mirror.
Also read:
- Plus size body types: how to determine yours (hub)
- "Apple" body type: what to wear
- "Pear" body type: what to wear
- "Hourglass" body type: what to wear
- "Rectangle" body type: what to wear
- "Inverted triangle" body type: what to wear
Which silhouette is the most versatile for everyday plus size?
Semi-fitted: it gives shape without tightness, looks good in motion, and is easy to style.
How do you know a silhouette is “yours”, even if it's not “by the rules”?
If you're comfortable moving, you're not constantly adjusting your clothes, and you like the outline in the mirror/photos — that's your silhouette.
Does an A-line silhouette always “hide the belly”?
It gives freedom, but if the flare is too strong and the fabric is stiff, the silhouette can add volume. A moderate trapeze + a fabric with good drape works best.
Why does a straight silhouette sometimes “add” volume?
Most often due to a poor length (ending at the widest point) and lack of vertical lines/shoulder structure. Add a vertical element (an open shirt/cardigan) and the silhouette becomes more put-together.
Can plus size wear a fitted silhouette?
Yes. The key is fabric density, an honest size, and the right length. “Body-hugging” shouldn't mean “tight”.